下面安装mosquitto-auth-plug
cd mosquitto-auth-plug
cp config.mk.in config.mk
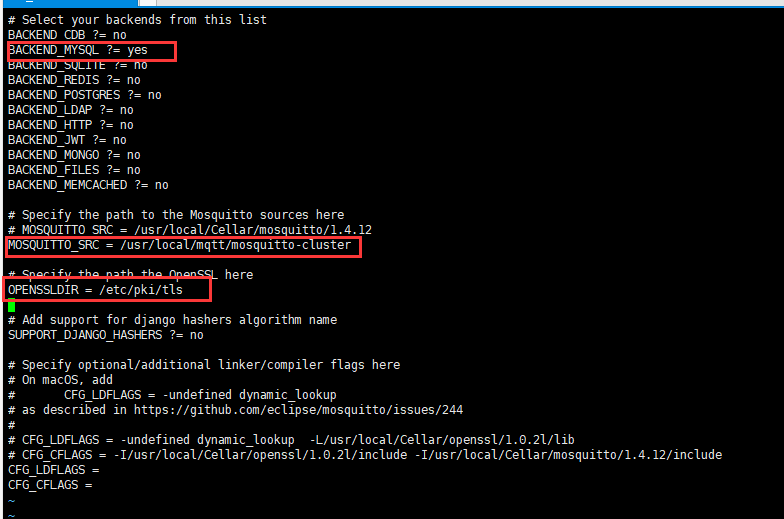
#修改如下图
说明
BACKEND_MYSQL = yes # 这个好理解。你要用哪种方式存你的用户你就将哪种改成yes
MOSQUITTO_SRC =  # 这里是你的mqtt安装包源码目录
OPENSSLDIR = # 这里是你openssl目录(我猜的),你可以通过openssl version -a查询
然后编译安装:
makeyum install mariadb-devel -y
# 安装好后继续编译
make
# 不出错了编译好后会生成auth-plug.so这个文件
将复制auth-plug.so至/etc/mosquitto/目录下 (个人感觉没意义)
将复制examples/mosquitto-mysql.conf至/etc/mosquitto/目录下
备份/etc/mosquitto/目录下原来的mosquitto.conf
将/etc/mosquitto/mosquitto-mysql.conf 文件名修改为mosquitto.conf
然后开始修改配置文件
autosave_interval 1800
persistence true
persistence_file mosquitto.db
persistence_location /tmp/
connection_messages true
log_timestamp true
log_dest stderr

#log_type error
#log_type warning
#log_type notice
#log_type information
#log_type all
log_type debug

### 我自己加的 start
allow_anonymous false
user nobody

listener 1883
protocol mqtt

listener 9001
protocol websockets
### 我自己加的 end
#
#   __  __       ____   ___  _
#  |  \/  |_   _/ ___| / _ \| |
#  | |\/| | | | \___ \| | | | |
#  | |  | | |_| |___) | |_| | |___
#  |_|  |_|\__, |____/ \__\_\_____|
#          |___/
#
#

#auth_plugin /home/jpm/mosquitto-auth-plug/auth-plug.so
auth_plugin /Users/jpm/Auto/projects/on-github/MQTT/mosquitto-auth-plug/auth-plug.so
#auth_opt_backends cdb,mysql 我们只需要mysql
auth_opt_backends mysql
#auth_opt_cdbname pwdb.cdb 不知道干嘛的删
auth_opt_host localhost # mysql主机地址,按实填写
auth_opt_port 3306 # mysql端口号,按实填写
auth_opt_dbname test # 数据库名称,按实填写
auth_opt_user jpm # mysql用户名,按实填写
auth_opt_pass secret # mysql密码,按实填写
auth_opt_userquery SELECT pw FROM users WHERE username = '%s'
auth_opt_superquery SELECT IFNULL(COUNT(*), 0) FROM users WHERE username = '%s' AND super = 1
auth_opt_aclquery SELECT topic FROM acls WHERE username = '%s'


# Usernames with this fnmatch(3) (a.k.a glob(3))  pattern are exempt from the
# module's ACL checking
auth_opt_superusers S*
然后将mosquitto-auth-plug/examples/mysql.sql这个文件导入到数据库,就可以。好像。。。。
有问题,我会回来说的。。。。


评论 (0)